KitKat Cheesecake Slice Recipe: Decadent No-Bake Delight
If you are looking for a dessert that combines creamy cheesecake with the crunchy, chocolatey goodness of KitKat bars, this KitKat Cheesecake Slice recipe is perfect for you. This no-bake dessert is indulgent, visually impressive, and surprisingly easy to prepare. It’s ideal for birthdays, parties, or simply treating yourself to something sweet and luxurious.
This recipe focuses on achieving a balance of textures: a crisp chocolate biscuit base, creamy and smooth cheesecake filling, and the signature crunch of KitKat bars on top. With just a few simple ingredients, you can create a show-stopping dessert that tastes like it came straight from a gourmet bakery.
Why You’ll Love This KitKat Cheesecake Slice
- No-Bake Convenience: Skip the oven and still get a rich, creamy cheesecake.
- Crunchy Texture: The KitKat topping adds a satisfying crunch to every bite.
- Versatile Dessert: Great for parties, gatherings, or a weekend treat.
- Easy to Customize: You can add chocolate drizzle, caramel, or even peanut butter.
- Beautiful Presentation: The layered look with KitKat bars makes it visually stunning.
Ingredients
For the Base:
- 200g digestive biscuits or graham crackers, crushed
- 100g unsalted butter, melted
- 2 tablespoons cocoa powder (optional, for chocolatey base)
For the Cheesecake Filling:
- 500g cream cheese, softened
- 200ml heavy whipping cream
- 100g powdered sugar (adjust to taste)
- 1 teaspoon vanilla extract
- 200g condensed milk
For the Topping:
- 6–8 KitKat bars (standard size), broken into pieces
- 50g dark or milk chocolate, melted (optional, for drizzling)
Optional Garnish: chocolate shavings, crushed KitKat crumbs, or fresh berries
Equipment Needed
- 8×8-inch square or similar-sized pan
- Mixing bowls
- Electric hand whisk or stand mixer
- Spatula
- Food processor or rolling pin for crushing biscuits
- Knife for cutting KitKat bars
Step-by-Step Instructions
Step 1: Prepare the Base
- Crush the digestive biscuits or graham crackers into fine crumbs using a food processor or by placing them in a sealed bag and rolling with a rolling pin.
- In a mixing bowl, combine the crumbs with melted butter and cocoa powder if using. Mix until the crumbs are evenly coated and hold together when pressed.
- Press the mixture firmly into the base of a lined 8×8-inch pan to create a flat, even layer. Use the back of a spoon or a flat-bottomed glass to compact it.
- Chill in the refrigerator for 10–15 minutes to set while preparing the filling.
Step 2: Make the Cheesecake Filling
- In a large mixing bowl, beat the softened cream cheese with powdered sugar and vanilla extract until smooth and creamy.
- Slowly add the condensed milk, mixing until fully incorporated. This adds sweetness and a silky texture.
- In a separate bowl, whip the heavy cream until soft peaks form. Be careful not to overwhip; it should be airy but still smooth.
- Gently fold the whipped cream into the cream cheese mixture using a spatula. Use slow folding motions to retain the airy texture, resulting in a light, fluffy filling.
Step 3: Assemble the Cheesecake Slice
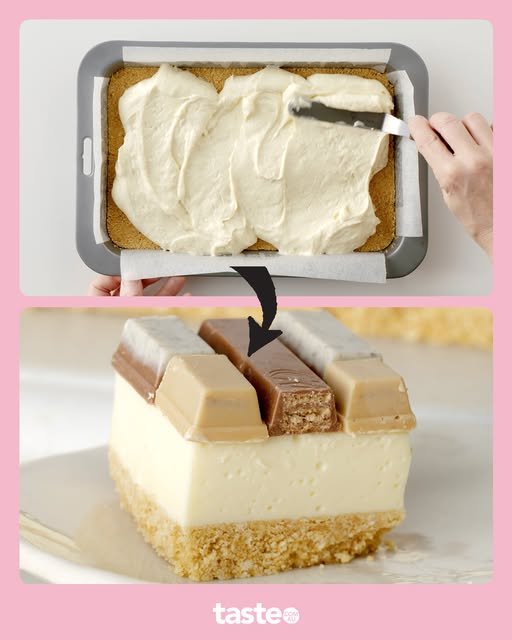
- Remove the base from the refrigerator. Pour the cheesecake filling over the chilled base, spreading it evenly with a spatula.
- Smooth the top and gently tap the pan on the counter to remove any air bubbles.
- Place the broken KitKat bars on top of the filling. You can arrange them neatly in rows or randomly for a more rustic look.
- Optional: drizzle melted chocolate over the KitKat pieces for an extra indulgent touch.
Step 4: Chill to Set
- Cover the pan with plastic wrap or foil and refrigerate for at least 4–6 hours, preferably overnight. This allows the cheesecake to firm up, making it easier to slice into perfect pieces.
Step 5: Slice and Serve
- Before slicing, run a knife under hot water and wipe it clean. This ensures smooth, neat cuts through the cheesecake and KitKat topping.
- Cut into 9–12 squares, depending on your preferred portion size.
- Serve chilled, garnished with chocolate shavings, crushed KitKat crumbs, or fresh berries if desired.
Tips for Perfect KitKat Cheesecake
- Softened Cream Cheese: Make sure the cream cheese is at room temperature to avoid lumps in the filling.
- Whipping the Cream: Fold whipped cream gently to maintain a light and airy texture.
- KitKat Placement: Place the KitKat bars just before chilling; adding them too early may cause them to soften.
- Cutting Slices: Warm your knife in hot water and wipe between cuts for smooth slices.
- Storage: Keep refrigerated in an airtight container for up to 4–5 days.
Flavor Variations
- Chocolate Lover’s Version: Add a layer of chocolate ganache between the base and cheesecake filling.
- Peanut Butter Twist: Swirl peanut butter into the filling before adding KitKat bars.
- Berry Infusion: Top with fresh strawberries, raspberries, or blueberries for a fruity touch.
- Mint KitKat: Use mint-flavored KitKat bars for a refreshing variation.
- Caramel Drizzle: Add caramel sauce on top for a decadent dessert.
Nutritional Information (Approximate per slice)
- Calories: 450–500 kcal
- Fat: 30g
- Carbohydrates: 40g
- Protein: 6–7g
Values vary depending on portion size and KitKat quantity.
Common Mistakes to Avoid
- Skipping Chilling Time: Cheesecake needs adequate chilling to set properly; don’t rush this step.
- Overmixing Cream Cheese: Overmixing can make the filling too soft or runny.
- Soft KitKat Bars: Avoid leaving KitKat bars in warm areas before assembling; they may melt into the filling.
- Uneven Base: Press crumbs firmly to create a solid foundation; a weak base may crumble when slicing.
Serving Suggestions
- Serve as a dessert after a meal or as an indulgent snack with tea or coffee.
- Pair with a scoop of vanilla ice cream for extra decadence.
- Perfect for birthdays, parties, or festive occasions as it’s visually appealing and easy to share.
Make-Ahead Tips
- This no-bake cheesecake can be prepared a day ahead, making it ideal for entertaining.
- Store in the refrigerator covered to prevent the cake from absorbing odors.
- Slice just before serving for clean, professional-looking pieces.
Why KitKat Cheesecake Is a Crowd-Pleaser
The combination of creamy, fluffy cheesecake and crunchy chocolate-covered wafers is irresistible. The visual appeal of KitKat bars on top, along with the rich texture of the cheesecake, creates a dessert that tastes as impressive as it looks. Kids and adults alike will enjoy the layered textures, making it a perfect treat for gatherings or special occasions.
Final Thoughts
This KitKat Cheesecake Slice recipe is a delightful no-bake dessert that combines simplicity with indulgence. By following the step-by-step instructions, you can create a dessert that is creamy, crunchy, and visually stunning. Whether for a celebration, a family gathering, or simply to satisfy a chocolate craving, this cheesecake will become a favorite.
Its versatility allows you to experiment with flavors, toppings, and presentation, making it a flexible recipe for any occasion. With a crisp biscuit base, a smooth cheesecake layer, and the signature KitKat crunch on top, every bite is a perfect harmony of textures and flavors.
Indulge yourself and your loved ones with this decadent, easy-to-make KitKat Cheesecake Slice and enjoy the sweet reward of homemade desserts.